Sunday, April 29, 2007

My First Sock!!

Yes, I do mean sock. I've finished the first one of a pair. I should probably wait until finishing the second sock before posting this as a finished project, but I was so excited with how the first one turned out that I had to write about it.

Here's the beginning of the sock, working on the cuff:


And here's where I'm working on the heel:


I couldn't resist trying it on well before it was done:


And here are a few final shots of me wearing the finished sock!


Monday, April 9, 2007

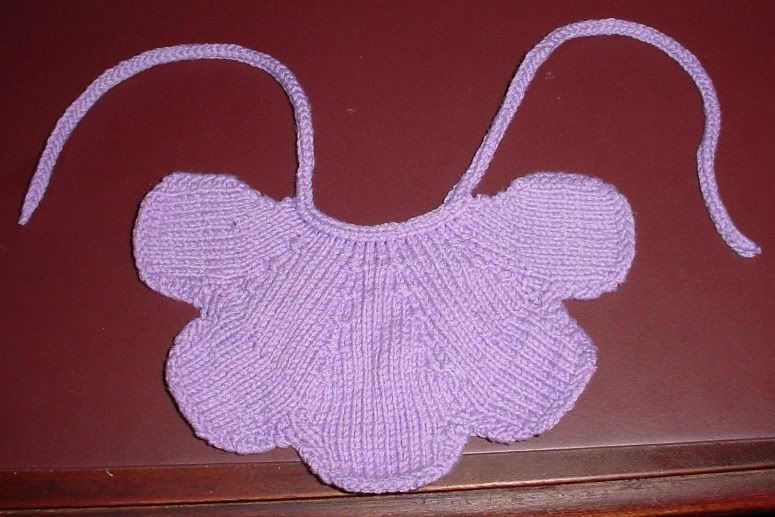
Bib #1

I'm working on a set of bibs for my brother-in-law and his wife, who are expecting their first baby this summer. This is the first bib, in purple. It was a little difficult because I had to create the five petal pieces separately, put them on stitch holders, and then knit them all together. But the challenge was worthwhile because I love the way the bib turned out.


For the other bibs, I have some pink yarn, so I'll do one completely in pink. Then, since the petals are done separately, I'm going to do two more bibs with some variation in the pink and purple (either all the petals and the tie in one color and the body in another or alternating petals in the pink and purple - I haven't completely decided yet).

Pattern: Petal Bib from One Skein
Yarn: Rowan Calmer (75% cotton; 25% acrylic)

Wednesday, February 14, 2007

Fingerless Mittens

I've been having really cold hands in the apartment, which makes it difficult to read and knit at times, so I decided to make some fingerless mittens. I had one ball of beautiful purple Malabrigo, so I decided it would be perfect and feel really nice against my hands.

Here's a picture of the first mitten in progress:


And here's the finished fingerless mittens. I wore the first one while knitting the second. And I've been wearing both of them most of the day since finishing them. My hands are definitely thanking me!


I learned a new technique with these. For the thumb hole, on one row I bound off four stitches and then on the next I cast back on those four stitches. I've never cast on stitches in the middle of a row before (I had to look up how to do it), but I think it turned out well.

Pattern: The Wave Hand Warmers from One-Skein Wonders edited by Judith Durant
Yarn: Malabrigo (kettle dyed pure merino wool and oh so soft!) in Purple Mystery
Needles: Size 8 double pointed

Monday, February 12, 2007

One Skein Felted Purse - Yellow and Green

Last month I made a little felted purse and fell in love with it. I had to make another one. Since it's knitted with two strands of yarn, I thought I'd try using two different colors. So I checked my stash and grabbed a green and yellow. One again, it came out rather nicely, although the colors aren't ones that I personally love. But that's okay as this is definitely one that I made specifically for the silent auction, so I hope someone else will like it. I also think that if I do another one, I'll try using i-cord for the handle.

Here's the purse before felting.


And then after felting, where the colors have blended in together rather nicely. (Still drying in the picture, hence the reason for the plastic bags you can see poking out of the inside.) Once it is dry, I'm going to add a magnetic button closure to it.


Here are the specs:
Pattern: One-Skein Felted Purse from One-Skein Wonders
Yarn: KnitPicks Wool of the Andes (100% Peruvian Highland Wool) in Forest Green Heather and Daffodil
Needles: Size 11 circular (24"); changed to straight needles for handle

Beanie

Jarrett doesn't have a hat and it's gotten pretty cold here, so I thought I'd try making one for him. I used the same yarn as the yarn in the "Tank Purse" since I have a lot of it still. Well, the hat turned out nicely, but I wasn't thinking ahead about fit, so it's too small for Jarrett. I'll have to do another one in a larger size for him. So I've tried it on myself - I don't really think I'm much of a beanie person, but it does fit me. Perhaps this will be another item for the silent auction in November. (I'm looking down in the picture so I can see the viewing screen on my camera. It's the best picture of the lot that I took, but the only one where I was looking down. *shrug*)


Pattern: The London Beanie
Yarn: KP Swish Superwash (100% Superwash Wool) – Bordeaux
Needles: Size 8 double pointed

Monday, February 5, 2007

Tank Purse

Okay, so I was working on the Tank Girl pattern in the first SNB book, a project I started way back in August. A project that I started before I truly understood the importance of yarn weight, needle size, and test swatches. Why is this important? Because the pattern used a bulky yarn with size 9 needles and I was using worsted and size 8. *sigh* I had gotten to the point of shaping the armholes:


But the whole time I was working on this (the back panel), I was wondering about the width. It seemed a bit narrow. I held it up to myself and noticed that it didn't stretch across my back to the sides unless I pulled on it a lot. Hmm...that would be a problem. I looked at the pattern again and noticed the difference in yarn and needle size. I also noticed a sketch that showed the dimensions of the piece. The width should have been 16-1/4 inches (or something close to that). What was mine? Only 9-1/2 inches!! Eek! No wonder it seemed a bit narrow. *big sigh* What to do? I didn't want to frog it all and start over. I just didn't have the heart. So I decided to make something different out of it.

An easy fold and some seaming and I had myself a purse! I did an i-cord handle (my first time with i-cord, which turned out nicely) and was happy with it:


The part where I had started the armhole shaping became the flap of the purse.


But there was one problem. When I held the purse by the handle, it sagged a LOT. So much so that it made the purse almost useless. So I decided to line it. I found this patterned felt and decided to try it. But I also used plastic canvas underneath to give it stiffness.


Well, the purse is now stiff and holds up perfectly when you hold the handle. But I think it might be a little too stiff and since I sewed the bottoms together, it is a bit narrow now on the inside. It definitely won't hold my fat wallet. I should have done a separate panel for the bottom. Grr.

Oh, well, I definitely learned a lot while working on this project (which I'm calling Tank Purse since it was originally a tank top pattern), and I hope I can use my lessons to benefit future projects. As for this purse, I'm not sure yet what I'm going to do with it. I used fabric glue to insert the panels, so I'm not sure if I can take them out. I might try to do that and then go buy more felt and try it without the plastic canvas. But I don't know if I can get the glue to unstick.

Original pattern: Tank Girl from SNB - adapted into a purse
Yarn: KP Swish Superwash (100% Superwash Wool) – Bordeaux
Needles: Size 8

Monday, January 29, 2007

Fuzzy Scarf

I belong to a group called Comitatus, which is our organization for students (grad and undergrad) interested in medieval studies. Each February we have a conference and for the past few years, we've had a silent auction in the fall to help fund the conference. I want to donate several knitted items to this year's silent auction and since I have quite a few months for knitting, I should be able to get a lot done. (The first item was the small felted purse that I finished earlier.)

A while back, I had bought two balls of this fuzzy novelty yarn, not really knowing what I'd do with it. It's been sitting in my storage tub, so I finally pulled it out and decided to just make a simple garter knit scarf, letting the fuzziness of the yarn be the attraction for the scarf. I'm glad that I didn't do anything more complicated. The yarn wasn't really that fun to work with. It was scratchy and hard to see the stitches. (When I finished, I forgot about leaving enough yarn for binding off so I had to go back and undo a row - that was horrible because I couldn't get a good feel for where the stitches were.)

But even though my hands feel scratched up now, the scarf has a mostly soft feel to it and looks neat. Since I had only two balls, it's a bit shorter than I would have liked, but we could just market it as a child's scarf or something if necessary.

This picture shows the color better than the one below.


And this picture shows the fuzziness a bit better.


Details:
Yarn: Bernat Boa Nouveau; color: Parrot? (#81305); 100% polyester
Needles: Size 9 straight
Pattern: Garter stitch

Wednesday, January 24, 2007

Felted Mittens

I found this pattern as a free pattern in Hobby Lobby and decided to try it out. I'm still learning how to use double pointed needles and I had never split anything off before (like you do here for the thumb), so I thought that if I made any mistakes, the felting might be able to cover them up.

So here's the first mitten as I was in progress on it.


And here is the first mitten - finished but before felting. It's definitely much bigger than my hand!


And here is the first mitten after felting. Quite a nice fit on my hand.


I had to wait a little while before working on the second mitten as I did not have enough yarn and had to order another ball. When it arrived, it took me only a couple of days to finish the second mitten. I did have a minor bobble around the thumb - when I picked the stitches back up for it, I got turned around (kinda like I did on the stocking), but I was able to get back on the right track quickly. But that's what the "ring" around the thumb is. I decided not to worry about it since they would be felted and it should disappear (it did). So here's the felted mitten beside the unfelted one (that gives you an idea of the difference in the size).


And now here is both mittens felted and finished and dry. The second one felted a little differently and is slightly more narrow than the first, but it still fits my hand (though it's a bit snug).


And finally, I tried taking a picture of me wearing them. I used my chin to push the button on the camera, so that's one reason why my hands are bent at a weird angle. But the picture came out well enough so you can see what they look like on my hands.


Here's the "technical" info:
Bernat Felted Knit Mittens
Yarn: KP Wool of the Andes (100% Peruvian Highland Wool) – Lake Ice Heather
Needles: Size 8 double pointed

Sunday, January 21, 2007

Blocks for Charity Afghan

Over on PaperBackSwap, someone is organizing an afghan for charity, so I decided to try my hand at knitting a block or two. I thought I'd try mixing two colors from my yarn stash and create something a little more than just one-dimensional color.

Well, that didn't work out so well. It looks neat, but it's not the right size. The blocks are supposed to be 7" x 9". Since I was using two strands of yarn, I didn't get a good feel for how many stitches I needed to cast on. So it turned out to be longer than I had planned (I meant that size to be the 7" side). When I measured it before, it was 10" but just now measuring it, it's actually 9" - wow!

That would be well and good except for one thing. I ran out of yarn before I could finish. So it's only 5" on the other side. *sigh* I'll go ahead and send it in case there are any other oddly sized blocks and it actually could get used. Here's the picture (a zig-zag design):


So I tried again. This time I went ahead with the one-color yarn. I used the yarn from Mary's scarf (I still had two balls). I used the same pattern and got the measurements much better (although I did block it to get even more exact). But it's not perfect. It's a little less than 9" on one side and a little more less than 7" on the other. *sigh*


I might try another block with another pattern, but I'm going to go ahead and send these two off tomorrow.

Monday, January 15, 2007

Emily's Scarf

Rainy Day Scarf
Yarn: KP ShineWorsted (60% Pima Cotton/40% Modal) – Blush
Needles: Size 8

I wanted to make a scarf for my friend Emily, but she's allergic to wool. She also lives in Texas so doesn't need anything too heavy. So I decided to try this cotton yarn. I like the way it came out, but the yarn was sometimes a bit annoying to work with (it slid out of my fingers too easily and sometimes fuzz came off all over my hands)

Here's the scarf, wrapped around my neck (mirror shot)

And here's a close-up view of the scarf:


I did have one bit that didn't turn out so wonderfully. I've been really tight while binding off, so I made it a point to bind off loosely this time. It looks like I was a bit too loose as the ends now don't match. One is tight and square and the other points out at the corners (that's the loose bind off). I'm sure I could block the scarf and make it all line up, but I like the scrunched in look that it has right now so don't want to lose that. I guess I'll just send it to Em and let her decide what she wants to do with it.